
How to Use the Brim Single-Note API
Brim offers a powerful REST API that allows you to automate chart abstraction tasks, streamline your research workflows, and integrate Brim into your existing data infrastructure.
There are two main ways to use the Brim API:
- Bulk upload and download, as described in How to Use the Brim API..
- By uploading and downloading single patient documents, which is covered in this article.
This guide provides an overview of how to get started, what you can do with the single-note API, and how to authenticate securely.
Getting Access
To use the API, you need an API Token. You'll find instructions for creating one in Creating a Brim API Token..
Brim uses bearer token authentication. Include your token in the header of each API request like this:
Authorization: Bearer YOUR_TOKEN_HERE
Workflow
An uploaded note follows a three-phase workflow: Upload, Generate, and Export.
Label generation happens asynchronously, with the returned results managed with a queue. You can interact with this queue with Peek and Pop, making a typical workflow consist of 4 steps, with Step 2 fully automatic.
Step 1: Upload note with generate_after_upload=true
         POST /api/v1/upload/note/
              │
              ▼
Step 2: Generate Labels. Note is saved, generation starts automatically
         (task enters Generation Queue when complete)
              │
              ▼
Step 3: Poll the queue for completed results
         POST /api/v1/queue/peek/
              │
              ▼
Step 4: Export results from the queue
         POST /api/v1/queue/pop-and-export/

How to Use the Single-Note API
| Action | Endpoint | Description |
|
POST | Upload a single clinical note |
|
Automatic or POST /api/v1/generate/task/ |
Trigger LLM abstraction |
|
POST /api/v1/queue/peek/ | View next completed generation task without consuming it |
|
POST /api/v1/queue/pop-and-export/ | Export and mark as exported |
| View errors | POST /api/v1/queue/errors/ | List failed generation tasks |
Step 1: Upload a Note
Upload a clinical note and optionally trigger generation in one call:
bash
curl -X POST https://your-server/api/v1/upload/note/ \
  -H "Authorization: Bearer YOUR_TOKEN" \
  -H "Content-Type: application/json" \
  -d '{
    "project_id": 123,
    "note_id": "NOTE_001",
    "person_id": "MRN_12345",
    "note_text": "Patient presented with symptoms of headache and nausea...",
    "note_datetime": "2025-01-15 14:30:00",
    "note_title": "Progress Note",
    "generate_after_upload": true
  }'
Response:
json
{
  "status": "success",
  "message": "Single note upload successful: NOTE_001",
  "data": {
    "generation_task_id": "456"
  }
}
Setting generate_after_upload: true means generation starts immediately after upload. The upload is synchronous (instant), while generation runs asynchronously in the background.
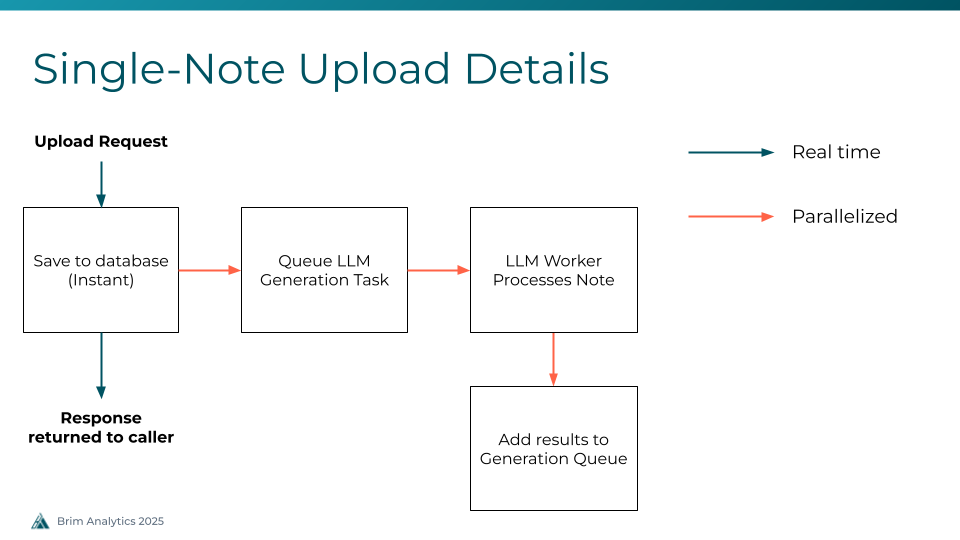
Step 2: Generate Labels (Automatic)
When generate_after_upload=true , generation happens automatically. The system:
- Saves the note to the database (synchronous, instant)
- Creates a generation task (async, queued to workers)
- Processes the note using the LLM and Brim variables.
- Places the completed task into the Generation Queue
Step 3: Poll the Queue
Completed generation tasks are placed into a first-in, first-out (FIFO) queue. This queue lets you retrieve results in order without needing to track individual task IDs.
View the next available task without consuming it:
bash
curl -X POST https://your-server/api/v1/queue/peek/ \
  -H "Authorization: Bearer YOUR_TOKEN" \
  -H "Content-Type: application/json" \
  -d '{
    "project_id": 123
  }'
Response:
json
{
  "status": "success",
  "message": "Next unexported queue entry",
  "data": {
    "queue_id": "42",
    "task_id": "456",
    "generation_status": "Complete",
    "generation_status_code": 2,
    "export_status": "Not exported",
    "task_options": {
      "G_MRN": "MRN_12345",
      "G_NID": "NOTE_001",
      "run_type": "ALL"
    },
    "progress": 5,
    "total_steps": 5,
    "total_count": 10,
    "unexported_count": 8
  }
}
Peek is read-only and safe to call repeatedly. Use it to check if results are ready before exporting.
Step 4: Export from the Queue
Pop and export the next (or a specific) task from the queue:
bash
curl -X POST https://your-server/api/v1/queue/pop-and-export/ \
  -H "Authorization: Bearer YOUR_TOKEN" \
  -H "Content-Type: application/json" \
  -d '{
    "project_id": 123,
    "mark_as_exported": true
  }'
Response:
json
{
  "status": "success",
  "message": "Export completed successfully",
  "data": {
    "queue_id": "42",
    "task_id": "456",
    "export_operation_status": "complete",
    "export_data": {
      "headers": ["Name", "Type", "Patient_id", "Note_id", "Value", "Associated Text"],
      "data": [
        ["diagnosis", "variable", "MRN_12345", "NOTE_001", "migraine", "headache and nausea"]
      ],
      "row_count": 1,
      "export_type": "detailed",
      "generation_status": "Complete"
    }
  }
}
Setting mark_as_exported: true prevents the same task from appearing in subsequent peek/pop calls.
View Errored Tasks
You can list generation tasks that failed with:
bash
curl -X POST https://your-server/api/v1/queue/errors/ \
  -H "Authorization: Bearer YOUR_TOKEN" \
  -H "Content-Type: application/json" \
  -d '{
    "project_id": 123
  }'
Response:
json
{
  "status": "success",
  "message": "Found 1 errored tasks",
  "data": {
    "tasks": [
      {
        "queue_id": "43",
        "task_id": "457",
        "patient_mrn": "MRN_67890",
        "note_id": "NOTE_002",
        "error_text": "LLM API rate limit exceeded",
        "started_at": "2025-01-15T14:35:00Z",
        "ended_at": "2025-01-15T14:35:05Z"
      }
    ],
    "total_count": 1
  }
}
Rate Limiting
The API enforces a limit on concurrent pending generations per project (default: 10). If you exceed this limit when using generate_after_upload=true , you will receive a 429 Too Many Requests response.
Handling rate limits:
- Wait for existing generations to complete before submitting more
- Use the peek endpoint to monitor queue progress
- Implement exponential backoff retry logic (see example scripts below)
Try It Out
You can explore and test all available endpoints at:
👉 https://demo.brimanalytics.com/api/docs#/
This interactive interface lets you try the API with your token and see example responses.
Example Scripts
To use the single-upload API, you'll need two processes: one to upload files, and another to pull results.
Upload Script
Download an example upload script.
The upload script reads clinical notes from a CSV file and uploads them one at a time with retry logic for rate limiting and transient errors. You can find the CSV format in How to Upload Notes.
Usage:
bash
python load_test_api_upload.py notes.csv \
    --api-token YOUR_TOKEN \
    --project-id 123 \
    --url https://your-server \
    --generate-after-upload \
    --delay 0.5
Key features:
- Automatic retry with exponential backoff on 429 (rate limited) and 5xx errors
- Configurable delay between requests
- Detailed statistics on success rate, response times, and retry counts
--max-rowsoption to limit uploads for testing
Export Script
Download an example export script.
The export script continuously polls the queue, peeks at available tasks, and exports them one by one.
Usage:
bash
python demo_queue_export.py \
    --api-token YOUR_TOKEN \
    --project-id 123 \
    --api-url https://your-server \
    --mark-exported \
    --continuous \
    --delay 2
Key features:
- Peek-then-pop workflow (check before exporting)
- Continuous polling mode for real-time processing
- Exports saved as JSON files to configurable output directory
- Summary statistics on export success/failure rates
End to End Example
Run both scripts together for a complete upload-to-export pipeline:
bash
# Terminal 1: Upload notes (generates automatically)
python load_test_api_upload.py notes.csv \
    --api-token YOUR_TOKEN \
    --project-id 123 \
    --url https://your-server \
    --generate-after-upload

# Terminal 2: Continuously export completed results
python demo_queue_export.py \
    --api-token YOUR_TOKEN \
    --project-id 123 \
    --api-url https://your-server \
    --mark-exported \
    --continuous \
    --delay 5
Need Help?
If you run into issues or have a question about what’s possible via the API, reach out to our team at any time by emailing support@brimanalytics.com.